Thursday, August 30, 2012

Summer Challenge Day 31: Recreate your favourite challenge


Summer Challenge Day 31: Recreate your favourite challenge

Today is the last day of this challenge! I’ve been through stuff that I thought I’d never do myself. (Half moons, water marbles and yellow polish, I’m looking at you!!). But it’s been fun. Some of the challenges have been pretty hard to come up with solutions for, but hey, that’s why they call them challenges.

So, today is the day that ends it all with a recreation of my favourite challenge.

It was a close race between two manis, but in the end I knew which one it was going to be. Have you guessed it already? I’m going to make the mani from day 21 again – inspired by a colour. Do you remember it? It was the day I let myself be inspired by a peacock.

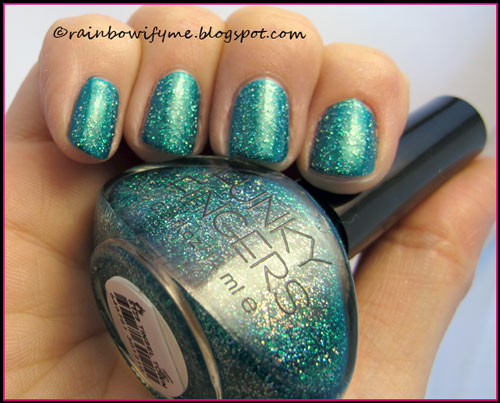
So here we go again. I used Star Gazer 304 again, but this time I picked Maybelline mini Colorama “Electric Blue” for the other half of my gradient. I have so many blues in this shade that I don’t want any of them to feel left out!

Here’s my gradient – Star Gazer Bottle: 


 And here it is again – Maybelline bottle:


Perhaps you can see it’s a bit textured. That’s because of the sponging, and because I don’t have any top coat on yet. We know that there’ll be added glitter in a moment anyway!

Icing makes some gorgeous glitters, and “Lemme see your peacock” is definitely one of them. Clear base, loaded with green and magenta glitters! I dapped it on with the tip of my sponge – I still wanted my gradient to be partly visible.

Here’s the final result. The top coat is Poshé, my all time favourite!


And here’s a pic of the involved polishes:

Icing: Lemme see your peacock, Star Gazer: 304, Maybelline mini Colorama: Electric Blue

I’ve been in this challenge with other Danish girls, and I want to send a special thanks to all of them for taking the polish journey with me.Thanks girls, you're awesome!

Here they are:

That’s it. I’ve got another challenge in mind, but I’m not quite ready yet. I’ll keep you posted!

I hope you enjoyed my series of summer challenge manis.  

Wednesday, August 29, 2012

P2 Deep Water Love ~ 030 Blue Horizon


P2 Deep Water Love ~ 030 Blue Horizon  
Bright blue with shimmer that flashes purple

I don’t own many P2 polishes, but I really like the ones I have. This blue is a little bit outside my comfort zone, but since I really like the shimmer, I decided to give it a go anyway.

The application was easy and it covered in two coats. Drying time was a bit on the slow side but I managed not to dent it in the waiting period :D I love how vibrant this turned out to be.


Then I dotted on it, using Spoiled by Wet n Wild’s “The Parking Meteor Expired”, which is a blackened teal. It doesn’t look like teal on the nails though, at least not when dotted on. It only looks black. But never mind, there’s still more to come ;)

The good thing about “The Parking Meteor Expired” is that it’s a thick, opaque polish, which makes it good for both stamping and dotting!

Here are the dots:


Then I wanted to add some sparkle to it (surprise!!), and chose another Spoiled by Wet n Wild polish called “My Saturn broke Down”. It’s a jelly-ish light blue polish with iridescent glitter in. It’s very sheer, so it’s definitely a layering polish.

I applied one coat and then sealed it all up with a generous coat of Seche Vite top coat.

Here’s the final result:


Here are the involved polishes:


I am quite pleased with the mani myself, but what do you think?


P2 Deep Water Love ~ 030 Blue Horizon  
Opacity: 7/10
Colour, prettiness: 6/10
Durability: 7/10
Value for money: 6/10
Overall: 7.5/10
Buy again: No

Tuesday, August 28, 2012

Summer Challenge Day 30: Inspired by a tutorial


Summer Challenge Day 30: Inspired by a tutorial

This is one of the challenges I’ve been looking forward to! I love tutorials! And especially the ones that state “It’s super easy”. I found a great one on YouTube, and let me show you the result I got out of it first: 


Neat, eh?

And here’s the tutorial I made it after. 


It reminds me a bit of retro wall paper, I think it’s really cool. I’m definitely going to try it out with different colours!

Here’s the colours I used. For the base I used two coats of Sephora’s “Summer in Bangkok”. It’s a turquoise/green shimmer polish, that’s got such a great formula. It’s easy to apply and almost opaque in one coat. Here is a pic of two coats, no top coat. 


Then I applied a bit of glitter. I used Funky Finger’s “Tinsel Town”, which is a green base with green and holographic glitters. The base is relatively dark, so my guess is that it can be used on its own, and that it would probably take 3 coats to make it opaque. But here’s a pic of that step. One coat of Tinsel Town over the Sephora. 


After that I added the stripes, black and white alternately. I used Claire’s “Two way nail art pen & brush” in black and white for that step. I didn’t take a pic after that step – it’s all in the YouTube tutorial after all :D
 
And then it was time for some dotting. I used Flormar 400, which is a plain white crème, and Flormar NA12, which is a black striper. I used a double sided dotting tool.


I must admit that I’m more than pleased with how this mani turned out. I know that my hand isn’t as steady as in the tutorial, but hey, practice makes perfect, right?

 
Which colours would be cool to make this pattern with? Like, Turquoise, purple and silver? Suggestions are more than welcome! <3

There are other Danish girls who also did a “inspired by a tutorial” mani today. I’m curious about which tutorials they followed, so why don’t we check their blogs out?

Stay tuned the day after tomorrow - same bat time, same bat channel – that’s going to be the last challenge, and I’m going to recreate my favourite challenge. Can you guess which one it was?

Monday, August 27, 2012

Spoiled by Wet n Wild ~ Pick your poison

Spoiled by Wet n Wild ~ Pick your poison   
Shimmery red

I got this beautiful red in a swap with Katee from A Girl and her Polish. It kinda looks like any old red, but it’s actually quite different in more than one way.

Let me say right away: Application is a challenge. The formula is very thick, and the brush is very wide and the combination of those two makes it very tricky to apply this polish. Normally I prefer a thicker polish over a thinnie, but then the brush needs to be good to work with. This brush is as wide as the nail on my little finger, so there’s no room for mistakes. I did OK though, in my opinion anyway :D

Next special thing is that it’s a single coater. I was amazed over how good it looked after just one stroke with the brush!

OK. Enough talking – here’s one coat, no top coat:


Stamping time! I used two plates from Essence (they don’t have names or numbers) for the paw prints, and big stamping plate K (appropriately) for the Kitty Cats. I used a no-name white stamping polish.

Here’s the result before the top coat. I was very pleased with it!!


Then I applied one coat of Poshé top coat, and then it all went horribly wrong. This has happened before: The top coat makes the white suck up some of the colour from underneath, and so I ended up with coral-coloured paw prints and cats on my nails.

Yucksville!!


I lived with it for a couple of hours before I just had to take it off. Coral is definitely not my favourite colour, no no no!


Opacity: 10/10
Colour, prettiness: 9/10
Durability: N/A/10
Value for money: 8/10
Overall: 9/10
Buy again: Yes

Sunday, August 26, 2012

Summer Challenge Day 29: Inspired by the supernatural


Summer Challenge Day 29: Inspired by the supernatural

This challenge takes us around a bit. From books to movies, from fashion to colours, and now to the supernatural.

The first thing that springs to mind when I think of the supernatural is ghosts.

So I started out my mani by making a Skittle.

I used 3 coats of Essence “Free hugs” for the pinky, 2 coats of H&M “Berry Love” for the ring finger, 3 coats of Funky Fingers “Curacao” for the middle finger, 3 coats of Wet n Wild “Sunny Side Up” for my index finger, and 3 coats of Viva la Diva “51” for sweet little tom thumb.

While I was polishing my nails, I suddenly discovered that the blue Funky Fingers polish is scented. It smells like caramels!


Can you see where this mani is going yet? No?

Then I took my dotter and added a little bit of  black here, a little bit of white there, and finished it off with a bit of blue in between, and here’s my final result:


 And here are the ghosts on their own:


Did you know that the little ghosts have got names? Well they do. Take a look:


Here are the base colours polishes:

Essence: Free Hugs, H&M: Berry Love, Wet n Wild: Sunny Side up, Funky Fingers: Curacao, Viva la Diva: 51 

And the blacks, white and blue for the details:


I think this mani is super cute - in all modesty, naturally! But I’m more interested in knowing what you think, so please do share your thoughts in the comments below :)


There are other Danish girls who also did a “inspired by the supernatural” mani today. Come with me and let’s check out their blogs and see what they came up with, shall we?

Stay tuned the day after tomorrow - same bat time, same bat channel – for nails inspired by a tutorial! We’re approaching the end of this challenge now.

Saturday, August 25, 2012

Max Factor ~ Dazzling Blue


Max Factor ~ Dazzling Blue  
Light blue/green/purple multichrome

I bought this because I thought it was sea green. Little did I know that I’d got my hands on a multichrome that flashes more blue than green.

The formula is ok to work with. I was positively surprised by the brush – I had expected a very thin brush, but this one actually normal in size and good to work with. It took three coats to reach opacity. Normally it would have annoyed me to wait in between coats, but the drying time was fast so it wasn’t a chore to sit and wait.

Here’s what three coats without top coat looks like.


You can see that it flashes blueish green and purple. It’s a very special colour combo IMO. The colour is a bit pale, and I’ve stepped a little outside my comfort zone here. That’s why I chose to stamp on it, to darken it a bit.

I chose an all nail design from a stamping plate called A28 and I used a Spoiled polish called “The Parking Meteor has expired”, which is a blackened teal that looks absolutely gorgeous in the bottle. The shimmer looks amazing. That didn’t transfer onto the nail unfortunately, but the stamping worked.

Here’s how it ended up looking like:


I like that. But there’s still something missing, isn’t there? Glitter, of course! So I used my Jesse’s Girl “Opal Glitter”, which is a clear base with iridescent glitter. I wanted to spice up the “scales” of the snake skin.

And here’s the final mani. There’s no top coat involved at this point.
I call it “The Chameleon”! :)


And here’s a shot of the bottle. Look at that multichrome!


 Have you ever been expecting one colour from a polish, and then experienced something completely different? Do you prefer this mani with or without the glitter?


Opacity: 4/10
Colour, prettiness: 6/10
Durability: 6/10
Value for money: 4/10
Overall: 5/10
Buy again: No

Friday, August 24, 2012

Summer Challenge Day 28: Inspired by a flag

Summer Challenge Day 28: Inspired by a flag

This is one of the challenges where I knew for sure exactly what I’d pick just as soon as I read the subject. A flag. It would be obvious to do the flag from your country, wouldn’t it?! But hey – I like to do things that aren’t that obvious, so I picked another flag.

I don’t know if any of you know this, but I love skulls. I think they’re really cool and pretty, so I just knew that the flag that should inspire me today should be the skull and crossbones flag that the pirates use: Jolly Roger.

I started out with two polishes from my stash of untrieds: Perceval from A England and Glitz Gal from Sally Hansen’s Gem Crush series.

Perceval is a stunningly beautiful red. It’s a shimmery one coater, and I love it. I’m so glad I chucked it into the shopping cart when A England had a promo sale! Glitz Gal required two coats, dried very fast and dried up glittery and gritty. I painted my pinky with Glitz Gal and all the other fingers with Perceval.

Indoor pic:


Then I added a coat of Uninhibited from L. A. Girl’s Glitter Addict series on my index finger. It’s a clear base packed with black glitter. It’s such a special topper and I absolutely love it!


 Then I taped half of my middle finger nail with masking tape and painted two coats of Glitz Gal before removing the tape again.


You might think now that there’s not much Jolly Roger in this…?  Patience, dear girls – I’ve got stamping coming up. But first I applied a coat of Sally Hansen Diamond Shine top coat, just to protect it all while I worked.

I used Essence Matte Black stampy polish and the large stamping plate K (holiday designs). I stamped the same skull on my ring fingers and my thumbs, and then I sealed it all up with a generous coat of my all time favourite top coat, Poshé.

Here’s the final result. My mani, inspired by a flag:


The polishes involved: 


Please tell me what you think of this. Do you like that the nails aren’t all the same?

There are other Danish girls who also did a “inspired by a flag” mani today. Do you think that they all made the Danish flag, Dannebrog?  Let’s check out their blogs and see, shall we?

Stay tuned the day after tomorrow - same bat time, same bat channel – for nails inspired by the supernatural!

Thursday, August 23, 2012

Catrice ~ Dirty Berry


Catrice ~ Dirty Berry  
Dusty purple base with holo effect

The name suits this polish perfectly: The base colour is a dirty looking purple. There’s a scattered holo effect as well, but the sun wasn’t out when I took the pics, so I can’t document that, even though I would have loved to.

The formula was very easy to work with, and it took two very easy coats to reach full opacity. Not bad for a pale colour like this one!

Two coats, no top coat, indoor shot:


On to the next step: Sponging! I used P2 “Purple Sky” from the collection “Deep water love”, which I bought in a blog sale. Hurray for blog sales!

I taped around my nails and sponged the tips with “Purple Sky”. Purple Sky is a beautiful warm, shimmery purple. I think those two purples look great together, even though they are very different.

Here’s how that looks like. There’s still no top coat involved, ‘cause there’s more to come…


Then I added the last thing, the bling! I chose Spoiled “Trust Fund Baby”, which is a clear base with pink, turquoise, black and gold glitters. I tried to get as little glitter on the brush as possible, in order to not let it take over the complete mani. I still wanted the gradient to be visible!

Here’s that last step, and how the mani ended up looking like. Still no top coat – I added that later, after I had taken the pictures.


Catrice ~ Dirty Berry 
Opacity: 8/10
Colour, prettiness: 6/10
Durability: 7/10
Value for money: 7/10
Overall: 7/10
Buy again: Yes

Wednesday, August 22, 2012

Summer Challenge Day 27: Inspired by artwork

Summer Challenge Day 27: Inspired by artwork

I’ve had a lot of trouble with the interpretation of this challenge. I mean… artwork? Hmmm. I can’t even make a straight line, let alone copy Leonardo Da Vinci! So I’ve been looking around, searching for inspiration, but it took me quite a while to actually nail this one.

Here’s my inspiration:


Melted crayons on canvas!

I’ve seen some other blogger girls making manis where they make it look as if the nail polish drip down from their cuticles, and I’ve been dying to try this forever! So I thought this was the perfect opportunity to just do it.

I started out with two coats of NYX “Acid Pink”, which is very pink with blue microshimmer. It’s neon alright! Formula was perfect – easy application, good coverage, a reasonable drying time. 

Sunshine pic: 

 Indoor pic: 


Then I painted my “drips” on with a thin brush and a dotting tool. I used L. A. Girl’s metallic nail polish “Millenium”, which is a great metallic purple. It’s a one coater, and it’s perfect for this purpose!

Here’s the final result. Sunshine pic: 


 Indoor pic:

 There are other Danish girls who also did a “inspired by artwork” mani today. I’m very curious about what they have used as their inspiration, so let’s check out their blogs, shall we?

Stay tuned the day after tomorrow - same bat time, same bat channel – for nails inspired by a flag!

Tuesday, August 21, 2012

Color Club ~ You Got Soul-Ar

Color Club ~ You Got Soul-Ar
Neon orange with non-sparkly glitter

It’s been ages since I paid attention to my Color Club collection. I looked through them and found this very bright orange with (what looks like) holographic glitter. It’s from the Starry Temptress collection from summer 2011. I don’t wear much orange, so I mostly bought it because I found the colour extremely cool.

So, application was not on the easy side. The formula is very thick, and difficult to work with. But that also means that it’s pretty opaque, and it covered perfectly in two coats. Drying time between the coats was remarkably fast, which is always a plus in my world.

It dries up matte, like many neons do, and the glitters aren’t glittering. A weird glitter actually, but I like the effect.

I was so lucky that the sun was out, so here’s a shot from its neon side! It’s wham pow in your face!!


And here is an indoor pic:


I stamped on it, using an Essence plate (unnumbered) for the tiger stripes, and a plate called A28 for the tigers. I stamped stripes on three fingers of each hands and tigers on two. I used a no name black stamping polish, which I’ll have to replace soon, because the top coat pulls on it - even Poshé which usually behaves pretty well on stamps.

Anyway – here are your pics. It’s all sealed up with a layer of Poshé top coat.


And the indoor pic. I find it quite difficult to actually photograph all the five fingers in one go :D


Opacity: 9/10
Colour, prettiness: 6/10
Durability: 7/10
Value for money: 8/10
Overall: 7.5/10
Buy again:No

Monday, August 20, 2012

Summer Challenge Day 26: Inspired by a pattern

Summer Challenge Day 26: Inspired by a pattern

Patterns, eh? I googled patterns, and there’s quite a lot to choose between. After a lot of browsing, I decided to go for none of them :D 
Instead I went pattern-hunting in my own house. And after having browsed from room to room I ended up with something useful. I’ll get back to what it was at the end of this post.

The finished manicure ended up looking like this: 


 I used “Deeper Dive” by Spoiled. It’s a teal, shimmery jelly with small flakies in it, and it is opaque in two very easy coats. I love the polishes from Spoiled, even though the fat brushes can be a challenge to work with. Here are two coats of Deeper Dive – without any top coat on.


I stamped with a no name silver stamping polish and I used the bubble motif from Mash’s stamping plate #50. I really like how this mani came out! 


 Are you curious about where my inspiration came from? Or have you guessed it already?

Here’s my inspiration:


My shower curtain! :D

I had in mind to make the rings with a drinking straw dipped in polish, but my nails are too curved for that, even though I have never thought of them as particularly curved. I didn’t manage to make one single ring with the straw, no matter how hard I tried. So thank god for stamping plates, when everything else fails!


There are other Danish girls who also did a “inspired by a pattern” mani today. It’ll be very interesting to hear where they found their inspiration, so why don’t we check their blogs out?

Stay tuned the day after tomorrow - same bat time, same bat channel – for nails inspired by artwork!

Saturday, August 18, 2012

Summer Challenge Day 25: Inspired by fashion

Summer Challenge Day 25: Inspired by fashion
(- or “The Purple Bomb”!)

Following other people’s fashion just isn’t my kind of thing, so I had to depend on Google for this challenge. Again :D

I managed to find a picture that I could use as inspiration for this challenge. I forgot to write down where I found it – so proper credit will be given once I’ve found the pic on its original place again.

I started out with a gradient using three different purple polishes. I used Herôme “Canberra” as my base, as this was the lightest polish of the three. The other two polishes were L. A. Girl “Groupie” and E.L.F. “Party Purple”.


And from a different angle:


I’m wearing a coat of Poshé top coat on these pics.

And here are the polishes I used for the gradient: 

E.L.F. – Party Purple, L. A. Girl – Groupie, Herôme – Canberra

Then I took a thin brush and three different purple OPI polishes and started making brushstrokes of purple on my gradient. I used OPI Temptation first because I didn’t want the glitter to be prominent, then OPI Ink and OPI DS Original as the final holographic touch.

And here’s the result – after adding another coat of Poshé top coat.


And from another angle:


And a sunshine pic, to show off the holo: 


The polishes: 

OPI DS Temptation, OPI Ink, OPI DS Original

Here’s the picture that I got my inspiration from:


Can you see the resemblance? The mani didn’t quite turn out like I wanted it to, but I am quite pleased with the result anyway. Do you like it?


There are other Danish girls who also did a “inspired by fashion” mani today. I am very curious about what they came up with, so let’s check their blogs out:

Stay tuned the day after tomorrow - same bat time, same bat channel – for nails inspired by a pattern!